Defining an Airflow Job
You can start creating and scheduling Airflow jobs once you have:
-
Added the Airflow user to TA.
-
Defined your Airflow connection(s).
For more information about these items, see Configuring an adapter.
To run and monitor an Airflow DAG from Tidal Automation, create a TA job definition. The job or processes may already exist within Airflow.
You can create an Airflow job using the shortcut menu within the Jobs pane. You can also edit, copy, and delete an existing Airflow job. If you add an Airflow job to a TA job group, items common between the job group, and the Airflow job are inheritable. However, unless the parent group has an Adapter assigned to it, clear the Inherited option and choose an appropriate Airflow connection on the Run tab.
About the Airflow Job Tab
The Airflow Job tab contains the parameters you can use to configure an Airflow job to run within TA.
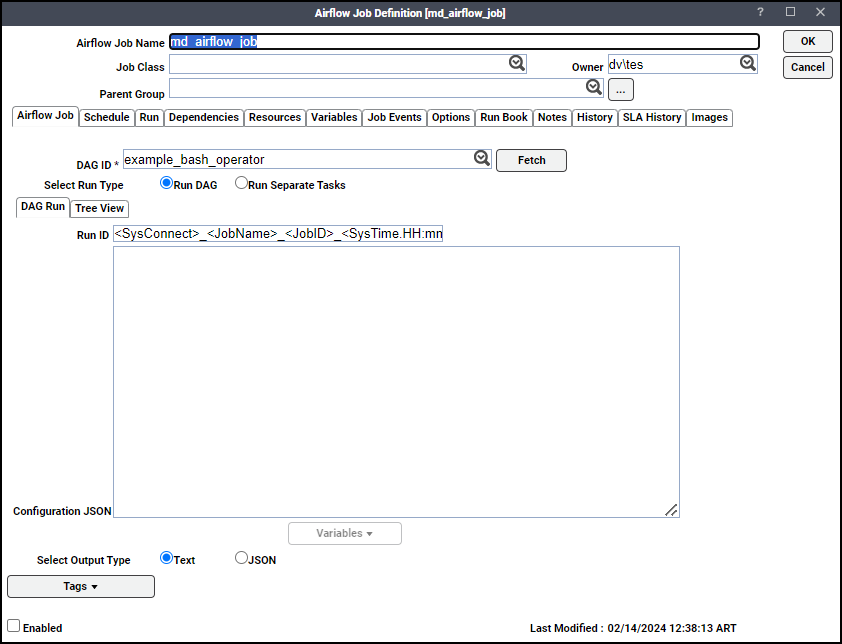
The tab contains these elements:
-
Airflow Job tab displays the Airflow-specific job definition parameters.
-
DAG ID field lets you choose which Airflow DAG to use for this TA job.
-
Fetch retrieves the predefined DAGs from the Airflow Server.
-
Select run type field determines whether the TA job should run a DAG or a set of tasks within a DAG.
Note: When the Run DAG radio button is selected, these tabs help you configure the selected DAG run.
-
Run ID field lets you customize the building blocks for the ID of the job run.
Note: Refrain from using spaces in the Run ID field for the correct functionality.
-
Configuration JSON field lets you optionally pass variable values into the DAG Python script as a set of name and value pairs in a JSON format.
-
Variables drop-down list lets you choose system and job variables to use for the Run ID building blocks.
-
Select Output Type radio buttons let you choose whether to display the output in the Output tab of a Job Details dialog as plain text or as JSON.
Airflow Job Tab Tree View
Enable the Run DAG radio button to display a tree view of the DAG.
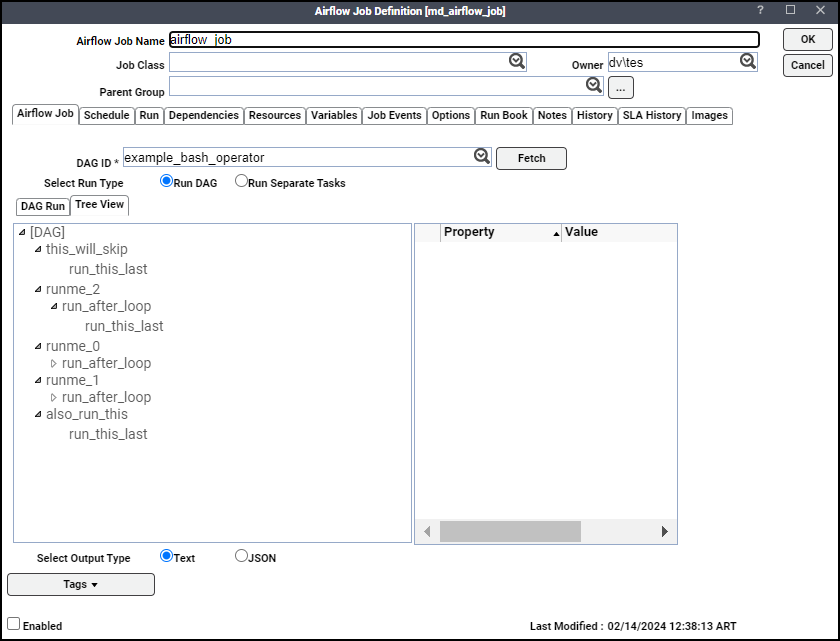
The Tree View tab shows a hierarchical view of the processes that comprise a DAG. The Tree View field shows the task hierarchy.
The Property and Value fields show information about the selected process.
Airflow Job Tasks View
The Tasks view is visible when the Select run type is set to Run Separate Tasks. It allows you to run a subset of tasks within a DAG.

This tab contains this information:
-
Run Separate Tasks radio button shows the Tasks view of the selected DAG.
-
Tasks tab alphabetically lists the tasks that comprise the DAG. The user-selected subset of tasks to run are highlighted.
How to define an Airflow Job
To define an Airflow job:
-
Сlick Definitions > Jobs on the Navigation pane to display the Jobs pane.
-
Choose Add from the TA toolbar or right-click in either the Navigation or Jobs pane. Choose Airflow Job from the shortcut menu to display the Airflow Job Definition dialog with the Run tab selected.
-
Click the Airflow Job Name field and enter a name up to 50 characters in length for your job.
Note: Refrain from using spaces in the Name field for the correct functionality.
The Airflow Job Name is an identifier for TA only. All of the other job definition information, such as Job Class, Owner, and Parent Group, is also the same as non-Airflow jobs and is used in the same way.
-
Choose Run tab.
If your Airflow job is in a group, unless the parent group selected has an Airflow connection assigned, clear the Inherited option on the Run tab before you can choose an Airflow connection.
-
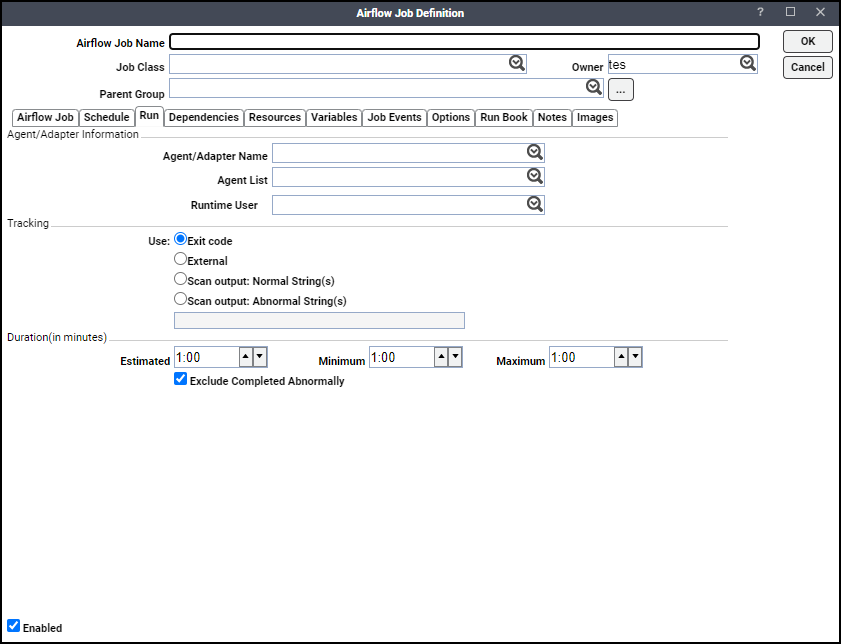
Click an Airflow connection in the Agent/Adapter Name section.
If no Airflow connections are available from the menu, verify that an Airflow connection has been defined, and that you are authorized to schedule jobs on that adapter.
The Agent/Adapter Name or Agent List is used by TA to identify the Airflow connection defined in the Airflow Connection Definition dialog. It does not have to be the same as the actual Airflow Server machine name.
Note: The name in this text field represents all the information in the Airflow adapter connection definition, including connection type, database server, database user ID, etc. To use different parameters, modify the connection definition, or define a new Airflow connection with a new name and then use that connection definition.
Alternatively, you can choose a agent list from the Agent List drop-down list for broadcasting the job to multiple servers, for high availability and for load balancing. See Defining an Airflow agent list.
-
Click the Runtime User list and choose the Airflow user created when Defining Airflow users. This list defaults to the user specified as the default operator ID in the Airflow Connection Definition dialog. The user defining the job should be authorized to use this runtime user.
-
Click Airflow tab.
-
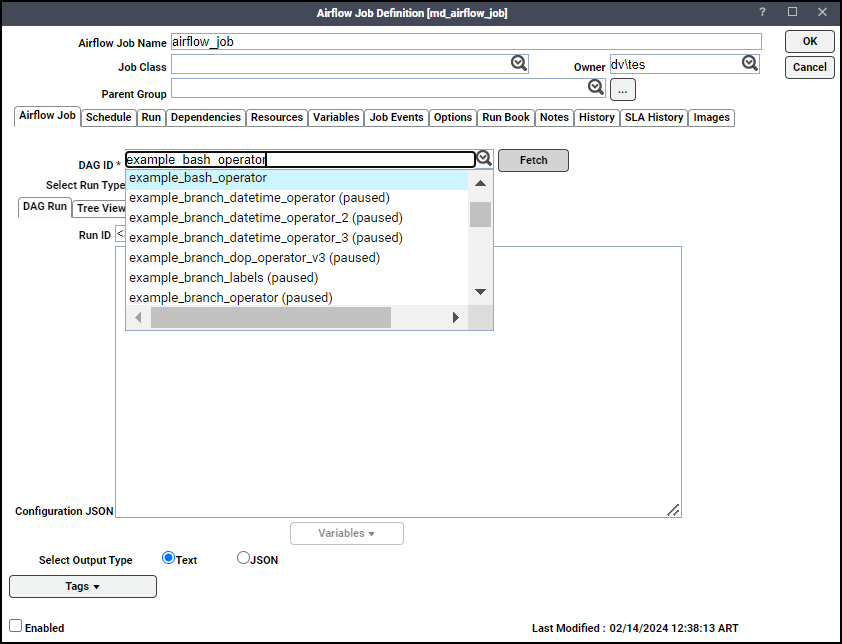
Click Fetch to get the available DAG IDs from the associated Adapter and populate the DAG ID field.
-
Click the DAG ID field and choose Airflow DAG you want TA to execute.
-
Click one of these run types in the Select run type field:
-
To run a complete DAG job, choose the Run DAG radio button and specify the desired parameters, see About the Airflow Job tab.
-
To run a subset of DAG tasks, choose the Run Separate Tasks radio button. You can choose one or more of the tasks to run with this TA job. Ctrl-click to choose multiple tasks.
-
-
Navigate to Select Output Type field and choose whether you want the text in the Job Details Output tab to be displayed as Text or as JSON.
If you click Text, the output will resemble this:

-
Click OK when finished.